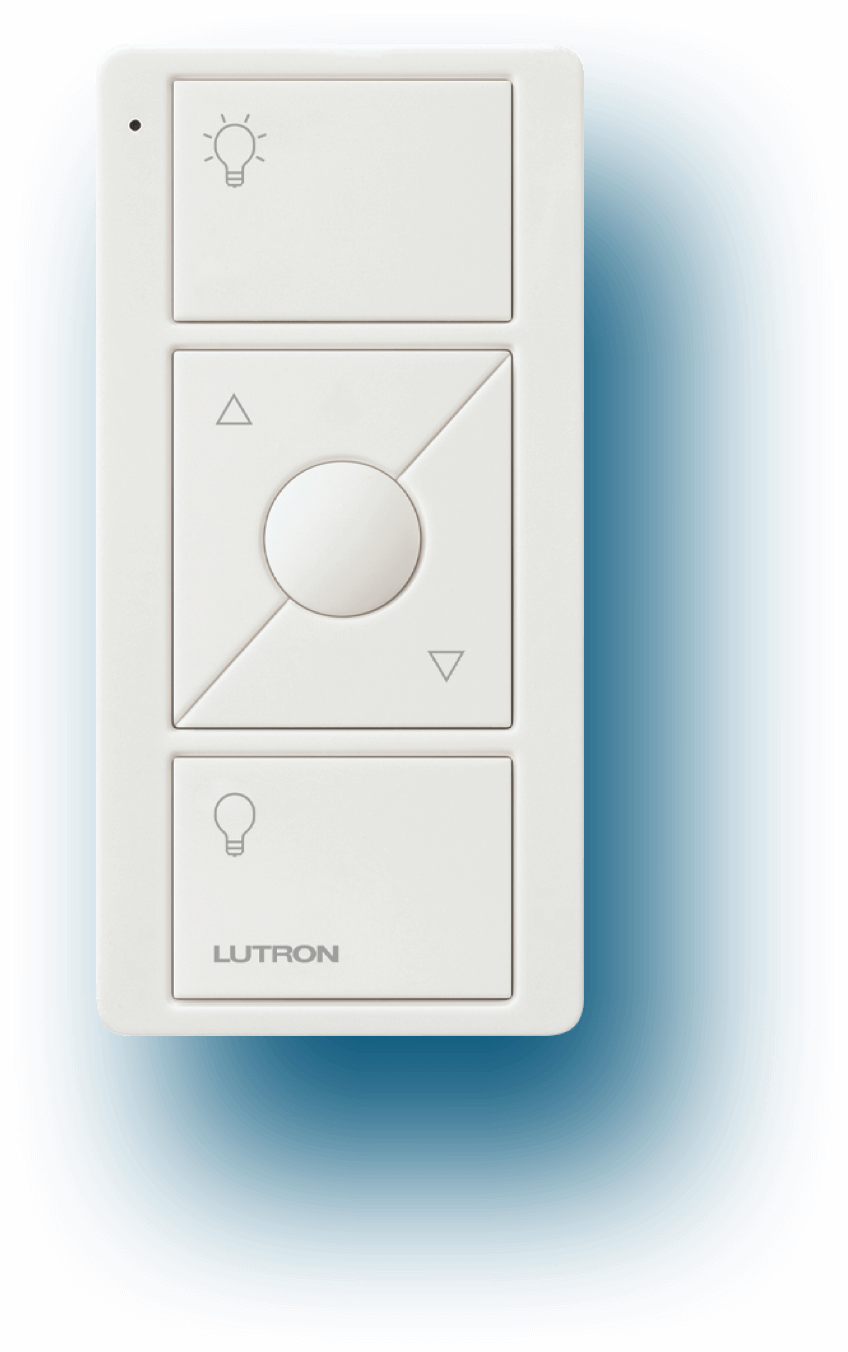
Use Lutron Pico remotes to control Home Assistant lights, shades, fans, media players, and switches. Keep each button's built-in behavior, replace its tap or hold with a list of actions, or add a double-tap action.
Pico Link 1.0 introduces a custom configuration UI inside Home Assistant. The Lutron Picos workspace lists your configured remotes, with search, Add Pico, and Shared defaults. Select a remote to assign its targets, choose a button on its visual preview, and configure tap, hold, or double-tap actions. Changes take effect when you save, without restarting Home Assistant.
Choose your configuration method before setup: UI for the visual workspace, or YAML for file-based configuration. Existing YAML installations continue working after an update. Moving their settings to the UI requires an explicit import and save.
Version 1.0 also includes Home Assistant's script engine for conditions, delays,
templates, loops and waits. Custom sequences default to single: another
custom gesture on the same Pico is ignored until the current sequence finishes.
Choose parallel for overlapping sequences or restart when the newest
command should take over. Built-in device controls retain their normal timing.
New in 1.0.1: opt-in native color cycling for the Stop/middle button, with editable palettes and a separate saved position for each Pico and gesture. Use shared colors or give a Pico its own palette; no separate script or helper is needed.


- Installation
- Choose your configuration method
- Getting started
- Using the UI workspace
- Default button behavior
- Button action overrides
- Action format
- Existing middle-button and scene-button configuration
- Settings reference
- Troubleshooting and updates
Pico Link requires Home Assistant's Lutron Caséta integration and supported
Picos that emit lutron_caseta_button_event press and release events.
Home Assistant 2026.4.0 or newer is required. This is the tested minimum
and includes the Lutron library support needed for Paddle Picos.
Pico Link uses the Lutron Caséta integration's event format. It does not support the different event format used by the separate Lutron integration.
Choose HACS or manual installation. Both install the same integration; configuring your remotes is a separate step below.
- Open HACS and its Custom repositories menu.
- Add
https://github.com/smartqasa/pico-linkwith the Integration type. - Open Pico Link in HACS and download the latest stable release. The UI described in this README is included in 1.0.0 and later.
HACS places the files in the correct configuration directory for you.
- Download and extract the source archive for your chosen release. Choose 1.0.0 or later for the UI described here.
- Locate Home Assistant's configuration directory: the folder containing
the active
configuration.yamlfile. See Home Assistant's instructions for finding it. - Create
custom_componentsin that directory if it does not already exist. - Copy the archive's entire
custom_components/pico_linkfolder into it, including all files and subfolders.
The destination is <your configuration directory>/custom_components/pico_link/.
The configuration directory does not have to be named config. Its visible
path depends on your installation and how you access the files:
| Where the active configuration file appears | Where Pico Link belongs |
|---|---|
/config/configuration.yaml |
/config/custom_components/pico_link/ |
/homeassistant/configuration.yaml |
/homeassistant/custom_components/pico_link/ |
Another folder containing configuration.yaml |
custom_components/pico_link/ inside that folder |
Keep this structure, with manifest.json and __init__.py directly inside
pico_link and the remaining integration files alongside them:
<your configuration directory>/
├── configuration.yaml
└── custom_components/
    └── pico_link/
        ├── manifest.json
        ├── __init__.py
        └── ... all other supplied files and subfolders
Do not create an extra config folder or place the whole downloaded repository
inside custom_components.
Restart Home Assistant after installing the files, then refresh your browser. Reloading YAML or refreshing the browser alone does not load a newly installed custom integration.
Choose your configuration method:
- UI: open Settings → Devices & services → Add integration → Pico Link, then follow UI setup. Existing YAML settings can be imported after you confirm the import; installing the files alone does not migrate them.
- YAML: follow YAML setup, then restart Home Assistant to load the file changes. You do not need to add Pico Link through the UI.
If you already use Pico Link, follow Installing an update instead of repeating initial setup. Existing YAML configurations remain supported.
Choose UI or YAML before configuring your remotes. The method applies to the whole Pico Link installation, so the same remote cannot receive commands from two configurations.
| Method | How to select it | Where settings are saved |
|---|---|---|
| UI (default for new installations) | Add Pico Link under Settings → Devices & services and choose UI. No YAML entry is needed for a new installation. | Home Assistant's managed configuration storage |
| YAML | Set config_method: yaml directly under pico_link, alongside devices and defaults |
Your existing YAML file |
Which choice takes precedence? An explicit config_method in your YAML
file is the authority. The choice shown during UI setup does not override it
or edit your YAML file. Choosing YAML in the setup dialog shows instructions
and exits setup; the file setting is what keeps YAML in control.
| Setting in YAML | Configuration that runs |
|---|---|
config_method: yaml |
YAML, even if UI settings were previously saved. The workspace is read-only. |
config_method: ui |
Saved UI settings. YAML devices and defaults are available for import but do not run. Complete UI setup if nothing has been saved yet. |
No config_method |
Saved UI settings take precedence if present; otherwise existing YAML continues to run. |
Changes to the YAML method setting take effect after restarting Home Assistant. Once you use UI configuration, ordinary workspace saves need no restart.
To keep using YAML, set the method explicitly in your existing configuration:
pico_link:
  config_method: yaml
  devices:
    - name: Kitchen Pico
      lights: light.kitchen
If configuration.yaml contains pico_link: !include pico_link.yaml, put
config_method: yaml at the top of pico_link.yaml, alongside devices
and defaults; do not add another pico_link: wrapper.
Existing configurations: if config_method is omitted, existing Pico Link
YAML continues to load until you explicitly import and save a UI configuration.
On first UI setup, Pico Link offers to import those settings so you do not need
to re-enter your remotes and actions. You confirm the import and complete setup
before it takes over. Installing the update alone does not migrate anything.
Explicit UI selection: you may set config_method: ui under pico_link.
This stops loading remote settings from YAML after the next restart. If no UI
configuration exists yet, complete setup and import before the remotes resume.
For an existing YAML installation without an explicit method, importing through
the UI lets the current remotes keep working until you save.
- Open Settings → Devices & services → Add integration → Pico Link.
- Choose UI. If an existing YAML configuration is found, confirm its import.
- Submit the final setup step, then open Pico Link in the Home Assistant sidebar. The integration's Configure button opens the same workspace.
- Select Add Pico and choose a registered Lutron remote. Its layout is detected automatically; a manual Pico layout override is under Remote & targets → Advanced. Under Remote & targets, choose what it controls and select its light, shade, fan, media-player or switch entities. Four-button scene Picos use targets inside their button actions instead.
- Select a button on the visual Pico, then Tap, Hold, or Double tap. Leave its normal behavior in place or choose Custom actions to build a sequence. Selecting buttons in the preview does not operate your devices.
- Select Save changes. Pico Link validates all remotes, stops its running actions, and reloads the settings without restarting Home Assistant.
Open Pico Link from the Home Assistant sidebar or the integration's Configure button. The workspace is available to administrators. If you already use UI configuration, your saved remotes appear automatically after an update; no reimport is needed.
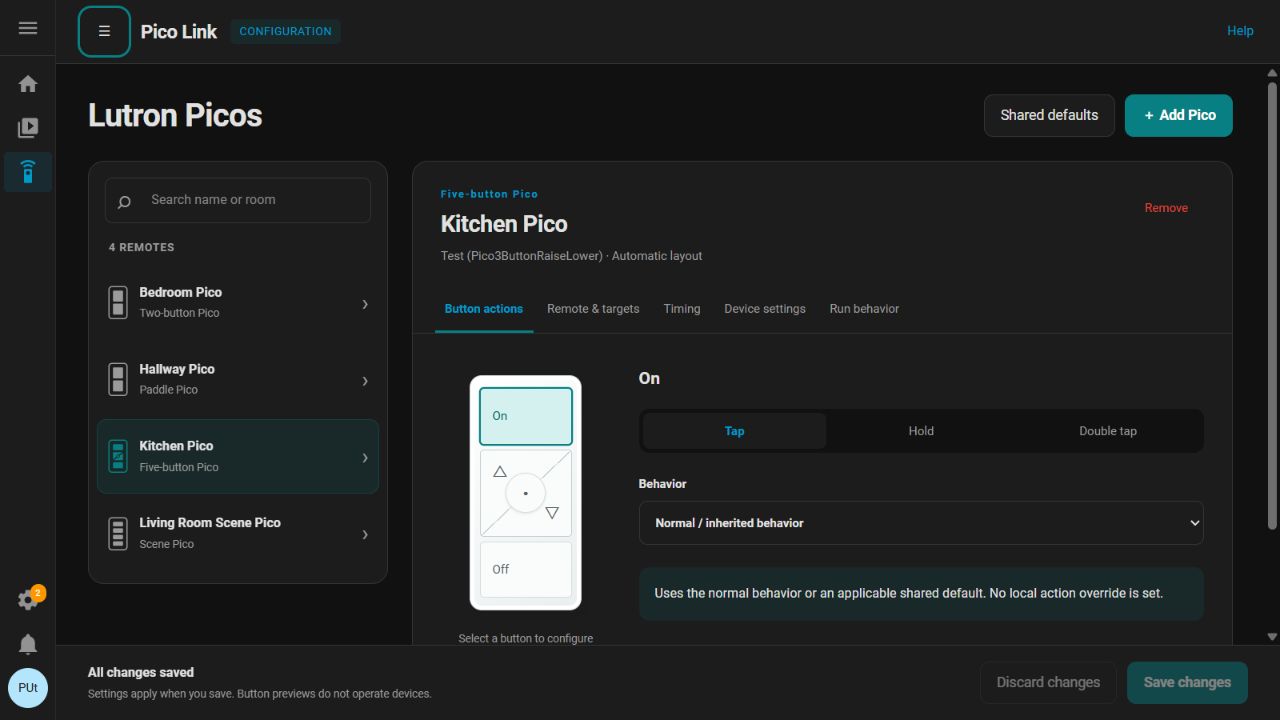
The Lutron Picos list is alphabetical and searchable by name or room. Each remote has an icon matching its layout. Select a row to edit that Pico, use Add Pico for another remote, or select Shared defaults for settings that multiple Picos can use.
The screenshots below show the actual workspace with simulated remotes and sample settings; no live home configuration is shown.
| Tab | What you configure |
|---|---|
| Button actions | Select a button on the remote preview, then choose its Tap, Hold, or Double tap behavior. |
| Remote & targets | Choose the physical Pico and the entities it controls. Advanced, directly below Remote identity, contains the read-only device ID with a Copy button and the optional Pico layout selector. |
| Timing | Adjust the hold threshold, double-tap window, and interval between built-in dimming or volume steps. |
| Device settings | Adjust the normal controls for the assigned device type, such as light brightness limits or shade direction. |
| Run behavior | Choose how the Pico handles another custom gesture while a sequence is running, including run limits and logging. |
UI configurations identify a remote by its Home Assistant device ID, so renaming it does not break its configuration. Selecting a different remote under Remote & targets reassigns the current settings to that remote; it does not load that remote's settings. Pico Link rejects duplicate remote assignments when you save.
Select the button and gesture, then choose a behavior:
| Behavior | Effect |
|---|---|
| Normal / inherited behavior | Removes the local override. The gesture uses its built-in behavior or an applicable imported shared setting. |
| Custom actions | Opens Home Assistant's action editor for service calls, scripts, conditions, delays, loops, and waits. |
| Do nothing | Disables this gesture while leaving the other gestures unchanged. |
| Use shared Stop action | Available for the Stop/middle button; uses the shared sequence for the selected gesture. |
| Cycle light colors | On a 3BRL controlling lights, advances one step in its palette. Also available as a shared Stop action. |
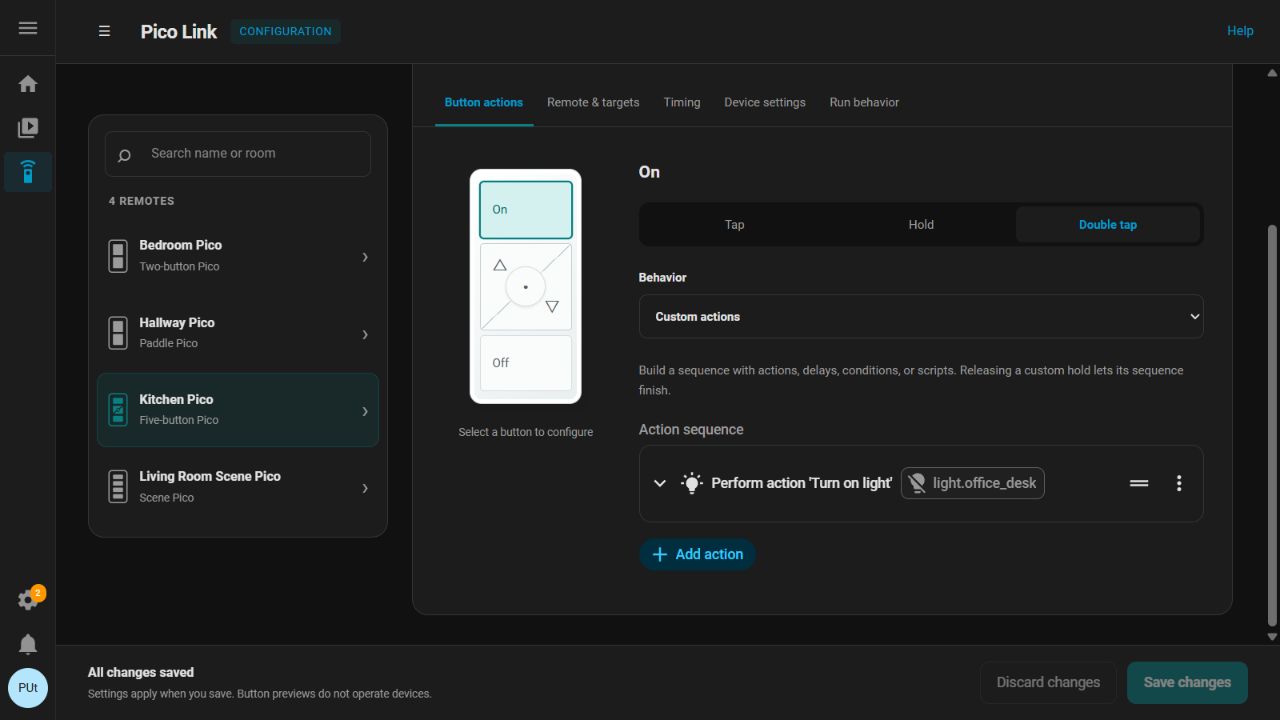
For example, select Raise → Tap → Custom actions to change a light's color temperature with a tap, while leaving Raise → Hold on normal behavior to keep dimming. Each gesture has its own setting.
Normal behavior depends on the Pico model and controlled device. Holds can have built-in behavior, such as dimming or volume adjustment; double tap has no built-in action. A custom hold runs its sequence once and lets it finish after release. Configuring double tap adds a short wait before the single-tap action. See Default button behavior and Tap and hold timing for the details.
Run behavior applies to the whole Pico, across its custom button sequences. Continue on error belongs to individual actions in the action editor.
In a Light: Turn on action, choose Add target, then select
Pico Link placeholder (normally light.pico_link_placeholder). Set brightness,
color, Kelvin temperature, or transition in the normal action editor. The short
instruction above the editor shows the placeholder's current name and ID.
When that Pico triggers the sequence, Pico Link replaces the placeholder with the lights assigned under Remote & targets. This works in individual button actions and shared Stop tap, hold, and double-tap actions, including nested conditions and loops. You can mix it with specifically selected lights in the same action or use different targets in other steps; only the placeholder is replaced. If a Pico's light assignment changes, the action follows that change.
Pico Link provides this entity itself; no helper or other custom integration is needed. It exposes broad light controls for editing, but the actual lights must support the requested features. Effect names depend on those lights. The placeholder is not a real lamp, should not be assigned a room or included in light groups, and cannot be operated directly. Save and test with the physical Pico: Run action has no triggering remote to supply the light assignment.
Picos using this placeholder must have lights assigned. Four-button scene Picos
have no assigned group and need explicit action targets. Existing lights
shortcuts appear as the selectable placeholder in the editor and remain
portable in saved settings. The other entity placeholders
remain supported through YAML; this selectable entity is for lights.
Open Shared defaults to set common timing, device-control settings, and run behavior. On an individual Pico, an empty field or Use default inherits the shared value, or the built-in value when no shared value is set. The inherited values appear beside the controls. Clear a local value to return to the default.
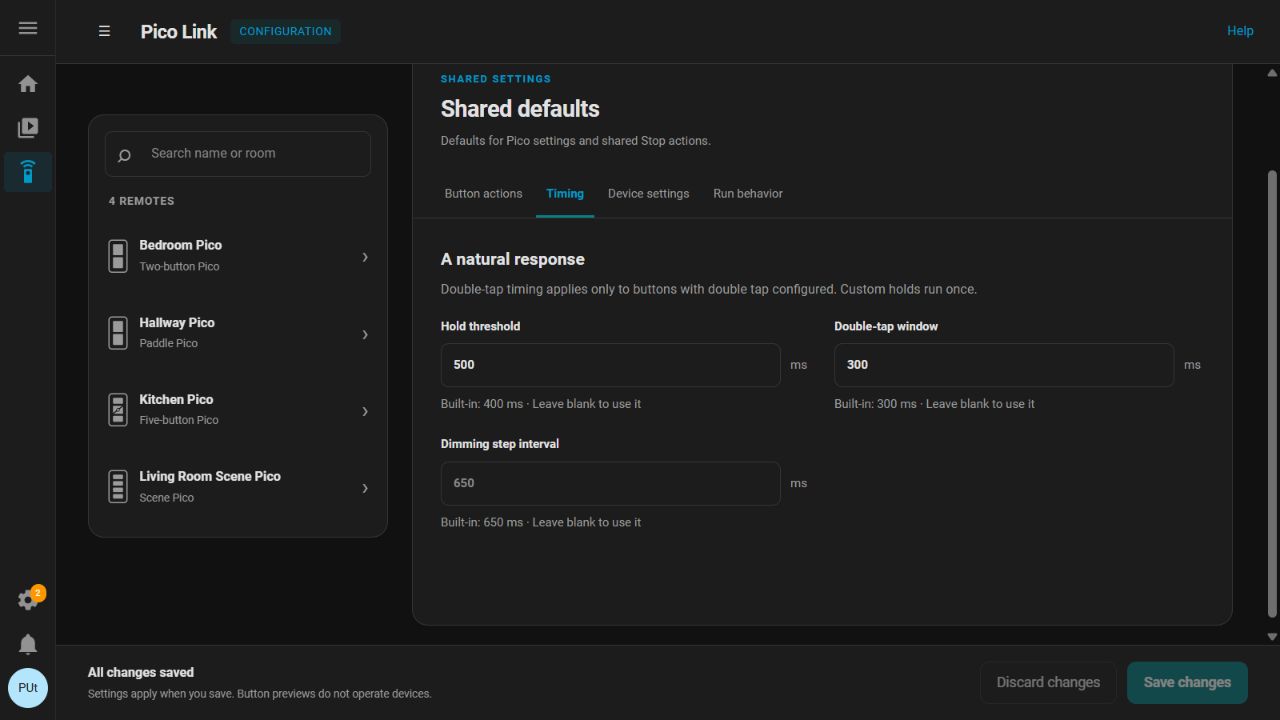
Shared Stop actions work differently: each Pico must explicitly opt in for each gesture. For example, create a sequence under Shared defaults → Button actions → Tap, then select Stop → Tap → Use shared Stop action on each Pico that should use it. Repeat separately for Hold and Double tap if needed. Merely defining a shared Stop sequence does not activate it on every remote.
Each shared gesture offers Do nothing (the default), Shared actions, or Cycle light colors. Choose Shared actions to build a sequence. If a Pico selects a shared gesture with no sequence, that gesture does nothing; it does not cause a configuration error. Individual Picos still offer Normal / inherited behavior, which keeps their built-in behavior instead of disabling it.
Native color cycling and palette editing are available through the UI only. Existing YAML configurations and custom action sequences remain supported.
Color cycling is optional and applies to the 3BRL Stop/middle button when the Pico has lights assigned. Existing settings, scripts, and button actions keep their current behavior until you explicitly select it.
- Open Shared defaults → Color palette and choose Tap, Hold, or Double tap. Each gesture starts with its own built-in palette: warm white (2800 K), cool white (4000 K), red, magenta, purple, blue, cyan, green, and amber.
- Change that gesture's colors with the color picker, or choose White temperature and enter Kelvin. Add, remove, or move entries up/down to set the order (1–25 entries).
- Under Shared defaults → Button actions, choose Tap, Hold, or Double tap, then Cycle light colors. On each participating Pico, choose Stop → that gesture → Use shared Stop action. Alternatively, select Cycle light colors directly on one Pico.
- Behavior is the only inheritance choice. Use shared Stop action inherits both the matching shared gesture's action and its palette: Tap follows shared Tap, Hold follows shared Hold, and Double tap follows shared Double tap. Edit these inherited settings under Shared defaults; the individual Pico does not show a palette editor for them. Cycle light colors opens an editable local palette immediately. The first time it needs local colors, Pico Link copies the matching shared palette. Subsequent shared edits do not change that copy. There is no separate palette source selector.
- Save changes, then test with the physical Pico. Selecting colors in the editor does not operate lights.
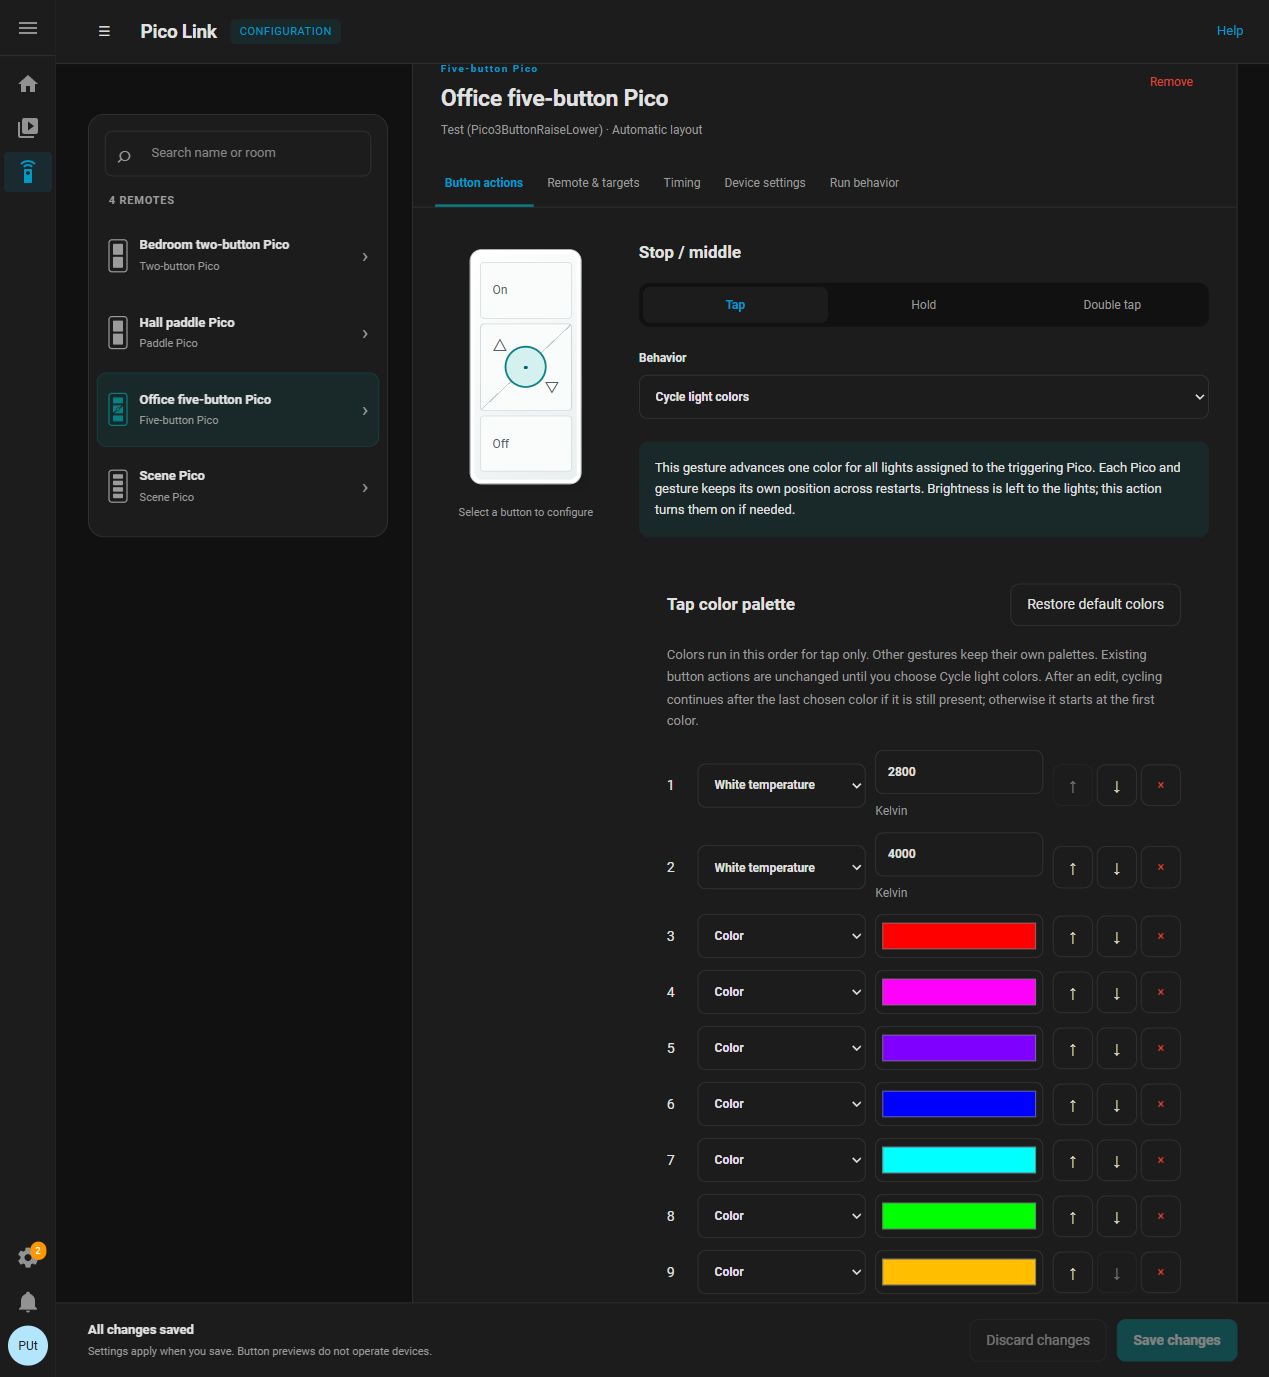
The example above uses a sample remote with the nine built-in default colors in its local Tap palette. Choose Cycle light colors to edit that Pico's colors directly, or Use shared Stop action to use the matching gesture's palette from Shared defaults.
Restore default colors restores the built-in palette and order in the editor you are editing, for only the selected gesture. Other gestures, other Picos, and shared settings remain unchanged. Restoring colors stays in the draft until Save changes; Discard changes restores the saved settings. Button assignments and other settings are unaffected, and the normal palette-edit rules below still determine the next color. Switching a Pico to Use shared Stop action keeps any local palette saved but inactive. Switching back to Cycle light colors restores those local colors, including after saving and reopening the editor. This also applies to palettes saved in earlier betas: a local palette is inactive while the gesture uses a shared action.
Each recognized gesture sends the next color to all lights assigned to that
Pico, in one call. The first gesture selects the first color; after the last,
it wraps to the first. A hold advances once, and the usual double-tap timing
rules still apply. The Pico's Run behavior also applies: single can ignore
a new gesture while another action is running; queued preserves admitted
presses in order, and restart cancels unfinished work. Parallel color cycles
are serialized within that Pico so they cannot select the same position at once.
Each position belongs to the Pico's Home Assistant device ID and gesture, not its target lights. Tap, Hold, and Double tap advance independently, even when their palettes contain the same colors. Picos also advance independently when they control overlapping lights; external color changes do not move their positions. Renaming a remote or changing its targets keeps its position. Selecting a different physical remote uses that remote's own position. After a palette edit, the next gesture follows the last selected color if it still exists; otherwise it starts at the first entry. For duplicate colors, the old index is kept if it still matches, otherwise the first matching entry is used. Editing or restoring one palette affects only that gesture's position.
When upgrading from a beta that stored one common palette, Pico Link copies those saved colors into three independent gesture palettes. The existing position is also copied to each gesture, preserving the next color rather than discarding your settings.
Pico Link saves positions separately in Home Assistant's managed storage
(.storage/pico_link.color_cycles). No helper entity, Essentials script, or
configuration rewrite is needed per press. Writes are combined over one second
and flushed during a normal Home Assistant shutdown. Abrupt power loss can lose
the latest unsaved step. A failed or cancelled service call does not advance the
saved position, although a device may already have received part of that call.
Cycling sends only a color or white temperature; brightness is left to the lights. Lights that are off turn on. The actual lights must support the requested color or temperature; the integration does not add those capabilities. Two Picos controlling the same lights can still send competing commands.
All workspace edits stay in a draft until Save changes. Saving validates the complete configuration and reloads Pico Link, which stops its running actions. A validation error leaves the saved configuration unchanged. Discard changes restores the last saved settings; leaving the workspace also discards unsaved edits. If another editor saves first, your save is rejected rather than overwriting its changes.
To remove a Pico, select it and choose Remove. Confirm the removal, then save. This removes its Pico Link configuration, not the Lutron device itself.
Home Assistant stores UI settings as JSON in its managed configuration storage,
not in pico_link.yaml. Use the workspace to edit them. An explicit
config_method: yaml selection keeps the workspace read-only; see
Importing YAML and switching methods.
Import copies shared defaults, remote assignments and actions, including the
existing middle_button and buttons formats. It resolves device names to
stable registry IDs and validates the whole configuration before saving. If a
remote or action is invalid, correct it before completing the import.
Once saved, UI settings are authoritative unless you explicitly select YAML. The original file is left unchanged. Remove its unused Pico Link block or keep it as a backup; UI edits are not written back to that file.
If you previously selected config_method: yaml, change it to ui and restart
before using UI setup. An existing saved UI configuration will resume; otherwise
add Pico Link and import your YAML. To return to YAML, restore or update the
file, set config_method: yaml, and restart. Saved UI settings remain inactive
and can be removed through Devices & services if no longer needed.
Add this to configuration.yaml, replacing the device name and light entity
with values from your system:
pico_link:
  config_method: yaml
  devices:
    - name: Kitchen Pico
      lights: light.kitchen
Restart Home Assistant after saving YAML changes. This example uses the normal light controls and the default timing; no extra settings or action overrides are needed.
Pico Link detects this remote's type during setup. You can still specify
type: 3BRL (or another supported type) on the device to select it explicitly.
If you prefer a separate file, put this in configuration.yaml:
pico_link: !include pico_link.yamlThe contents of pico_link.yaml then contain config_method: yaml, devices:
and optionally defaults:, without another pico_link: wrapper.
The type setting is optional on each device:
- Omit
type: Pico Link reads the model stored by the Lutron Caséta integration in Home Assistant's device registry and selects its button layout. - Supply
type: that value takes precedence; auto-detection is skipped. Existing configurations can keep their type settings unchanged. - If detection fails: Pico Link logs an error for that remote and continues setting up other valid remotes. Specify its type explicitly, or correct the missing model information, then restart Home Assistant.
Detection recognizes the Lutron hardware type in the stored model, such as
PJ2-3BRL-GXX-X01 (Pico3ButtonRaiseLower). It does not guess from the device's
name or model number alone. Detection runs during setup using local information;
it does not contact the bridge or add a detection delay to each button press.
If model information becomes available later, restart to retry detection.
When specifying a type, use one of these values:
| Type | Remote | Button names used in configuration |
|---|---|---|
P2B |
Paddle Pico | on, off |
2B |
Two-button Pico | on, off |
2BRL |
Four-button Pico with Raise/Lower | on, raise, lower, off |
3BRL |
Five-button Pico with Raise/Lower | on, raise, stop, lower, off |
4B |
Four-button scene Pico | button_1, button_2, button_3, off |
A 2BRL behaves exactly like a 3BRL without the Stop button: On and Off tap
the same way, Raise and Lower step and ramp the same way, and middle_button
and the stop_* gestures are rejected for it.
Stop and middle button refer to the same physical button on a 3BRL Pico,
including models with a favorite symbol. Use stop_tap, stop_double_tap, and
stop_hold for new action configurations; the older middle_button setting
remains supported. Button names refer to physical positions, even when their
actions are overridden. Pico Link ignores events whose reported hardware type
does not match the explicit or automatically detected type. An explicit type
does not bypass this hardware check. Empty or invalid type values are errors;
remove the key entirely to enable detection.
Use either name or device_id. Names must match the device name in Home
Assistant, which may include a room name. Pico Link checks the user-assigned
name first, then the integration-provided name.
If a name is ambiguous, use the Home Assistant device ID from a Pico button event instead. This is not the Lutron integration ID or a Home Assistant entity ID. For example, a device entry can begin with:
- device_id: 0123456789abcdef0123456789abcdef
  type: 2B
  switches: switch.closet_light
Configure each physical Pico only once. If both identification fields are
provided, device_id takes precedence.
P2B, 2B, 2BRL, and 3BRL remotes require exactly one of these entity groups, even when you override their buttons:
| Setting | Entity type |
|---|---|
lights |
light.* |
covers |
cover.* |
fans |
fan.* |
media_players |
media_player.* |
switches |
switch.* |
Use one entity ID or a list:
lights:
  - light.kitchen_ceiling
  - light.kitchen_pendants
Built-in actions control all entities in the group. Brightness, shade position, fan speed, and volume calculations use the first entity as the reference. For example, a brightness step calculates one value and sends it to every assigned light. Duplicate entity IDs are removed while preserving order.
A 4B Pico does not take an entity group. Configure its buttons with gesture
lists or the existing buttons mapping described below.
Settings under defaults apply to every device unless that device supplies a
replacement value, with the Stop and legacy middle-button exceptions below.
The optional type is device-specific and is not inherited from defaults.
Leave optional settings out to use Pico Link's defaults.
pico_link:
  defaults:
    light_low_pct: 25
    light_step_pct: 10

  devices:
    - name: Kitchen Pico
      type: 3BRL
      lights: light.kitchen

    - name: Bedroom Pico
      type: P2B
      lights: light.bedroom
      light_low_pct: 10
Action overrides can also be shared this way; a device's list replaces the whole inherited list for that gesture.
stop_tap,stop_double_tap, andstop_hold: a 3BRL opts into each shared list separately with, for example,stop_tap: defaulton the device. Shared lists are used only by devices that opt in, including the older tap setting described next. P2B, 2B, 2BRL, and 4B remotes do not inherit these settings.middle_button: keeps its opt-in rule withmiddle_button: default. It is the older name for the Stop tap action. Either tap name can use a shared list namedstop_tapormiddle_button;defaults.stop_tapwins when both shared lists exist.- An omitted or empty shared Stop list means Do nothing for Picos that
select
defaultfor that gesture. Picos that do not opt in keep their existing behavior. - Other gesture defaults: their keys must be valid for every remote that inherits them. Prefer device-level overrides when mixing Pico models.
For each Stop gesture on an individual 3BRL:
- Use
defaultto select its shared list. - Supply an action list to use that device's own actions.
- Use
[]to disable that gesture. - Omit the key to keep existing behavior, without selecting a shared list.
If a device supplies both stop_tap and middle_button, stop_tap wins.
Requesting stop_tap: default, stop_double_tap: default, or stop_hold: default
without a corresponding shared list means Do nothing. For tap,
defaults.middle_button is also accepted as that shared list. See the
shared Stop example.
If an earlier beta configuration used Stop gesture lists under defaults, add
the corresponding : default selections to the 3BRL devices that should use
them. Automatic inheritance of Stop gestures has been replaced by this opt-in.
These tables describe the built-in controls. Omitted overrides keep these actions. On buttons with no separate hold behavior, the normal press action runs once even if the button remains down.
| Remote | Button | Tap | Hold |
|---|---|---|---|
| P2B / 2B | On | Turn on at light_on_pct |
Brighten |
| P2B / 2B | Off | Turn off | Dim |
| 2BRL / 3BRL | On | Turn on at light_on_pct |
No separate action |
| 2BRL / 3BRL | Off | Turn off | No separate action |
| 2BRL / 3BRL | Raise | One brightness step up | Keep brightening |
| 2BRL / 3BRL | Lower | One brightness step down | Keep dimming |
| 3BRL | Middle / Stop | middle_button actions, otherwise no action |
No separate action |
When the light is off, the first Raise tap or upward ramp step turns it on at
light_low_pct. Later steps add light_step_pct. With a 25% minimum and 10%
steps, the commands are 25%, 35%, 45%, and so on. This also applies to On holds
on P2B and 2B remotes. A normal On tap still uses light_on_pct.
Dimming stops at light_low_pct; use Off to turn the light off. Lower while the
light is already off leaves it off. Rapid brightness taps use the most recently
requested value briefly, so they can accumulate before HA reports a new state.
light_transition_on and light_transition_off apply to built-in On/Off taps.
A zero value omits the transition field. Brightness steps and ramps do not add
transitions; custom actions can supply their own service data.
| Remote | Button | Tap | Hold |
|---|---|---|---|
| P2B / 2B | On | Open to cover_open_pos |
Move in the On direction |
| P2B / 2B | Off | Close fully | Move in the Off direction |
| 2BRL / 3BRL | On | Open to cover_open_pos |
No separate action |
| 2BRL / 3BRL | Off | Close fully | No separate action |
| 2BRL / 3BRL | Raise | Increase position by cover_step_pct |
Open continuously |
| 2BRL / 3BRL | Lower | Decrease position by cover_step_pct |
Close continuously |
| 3BRL | Middle / Stop | middle_button actions, otherwise stop |
No separate action |
Releasing a continuous hold sends a stop command. Built-in On/Off presses while a cover is moving stop it instead of starting another movement. This remains true when you add an On/Off hold override but leave its tap unchanged.
cover_inverted: true reverses On/Off tap and hold directions; it does not
reverse Raise/Lower. Rapid position taps use the most recently requested
position briefly. When a custom button interrupts a continuous hold started by
this Pico, Pico Link stops that movement before running the new actions.
| Button | Built-in action |
|---|---|
| On | Set speed to fan_on_pct |
| Off | Turn off |
| Raise (2BRL / 3BRL) | Increase to the next available speed |
| Lower (2BRL / 3BRL) | Decrease to the previous speed |
| Middle / Stop (3BRL) | middle_button actions, otherwise reverse direction |
Built-in fan controls run once per press and do not ramp on hold. Custom hold
overrides are available. Speed steps use the entity's percentage_step
attribute; without a usable value the available steps are off and 100%.
Raise from off selects the first nonzero speed. Reversing direction requires
the entity to report a current direction of forward or reverse.
| Remote | Button | Tap | Hold |
|---|---|---|---|
| P2B / 2B | On | Play/pause | Raise volume |
| P2B / 2B | Off | Next track | Lower volume |
| 2BRL / 3BRL | On | Play/pause | No separate action |
| 2BRL / 3BRL | Off | Next track | No separate action |
| 2BRL / 3BRL | Raise | Raise volume one step | Keep raising volume |
| 2BRL / 3BRL | Lower | Lower volume one step | Keep lowering volume |
| 3BRL | Middle / Stop | middle_button actions, otherwise mute/unmute |
No separate action |
media_player_vol_step is a percentage of the full volume range. Commands are
limited to 0–100%. Releasing a volume hold stops further ramp commands.
On turns the assigned switches on; Off turns them off. Raise/Lower on 2BRL
and 3BRL remotes do nothing by default. On a 3BRL, Middle/Stop runs
middle_button actions if configured. There is no built-in hold action,
but custom holds are supported.
Each 4B button runs its configured actions. There is no built-in light, shade,
or volume control and no automatic repeating hold. Unassigned buttons do
nothing. See the override example and the existing buttons format below.
Add an optional <button>_tap, <button>_hold, or <button>_double_tap list
to a device. Each list
replaces only that button's specified gesture. It can call services for
any entity, regardless of the remote's assigned entity group.
| Physical button | Tap key | Hold key | Double-tap key | Models |
|---|---|---|---|---|
| On | on_tap |
on_hold |
on_double_tap |
P2B, 2B, 2BRL, 3BRL |
| Off | off_tap |
off_hold |
off_double_tap |
All |
| Raise | raise_tap |
raise_hold |
raise_double_tap |
2BRL, 3BRL |
| Lower | lower_tap |
lower_hold |
lower_double_tap |
2BRL, 3BRL |
| Middle / Stop | stop_tap |
stop_hold |
stop_double_tap |
3BRL |
| First scene button | button_1_tap |
button_1_hold |
button_1_double_tap |
4B |
| Second scene button | button_2_tap |
button_2_hold |
button_2_double_tap |
4B |
| Third scene button | button_3_tap |
button_3_hold |
button_3_double_tap |
4B |
- Omit a key to retain its existing action, including existing
middle_buttonorbuttonsactions for taps. Stop gestures do not inherit shared actions unless the device selectsdefaultfor that gesture. - Use
defaulton a Stop gesture to select its action list fromdefaults. - Supply an action list to replace that gesture. An explicit
stop_taptakes precedence overmiddle_button; a 4B tap key takes precedence over that button's entry inbuttons. - Supply
[]to disable that gesture. An empty hold list also suppresses the tap when held past the threshold. Remove the key to restore the default. - A custom hold runs once when
hold_time_msis reached. Releasing the button does not also run its tap action or cancel an already started list. - A configured double tap runs its list once, replacing both single taps. An empty double-tap list consumes the double tap without running an action; remove the key to restore ordinary independent taps and their original timing.
- Existing brightness, shade, and volume holds retain their built-in behavior unless overridden. Custom action lists do not repeat while a button is held.
pico_link:
  devices:
    - name: Office Pico
      type: 3BRL
      lights: light.office
      light_low_pct: 25

      on_tap:
        - action: light.turn_on
          target:
            entity_id: lights
          data:
            brightness_pct: 60
        - action: switch.turn_on
          target:
            entity_id: switch.office_accent

      off_tap:
        - action: light.turn_off
          target:
            entity_id: lights
        - action: switch.turn_off
          target:
            entity_id: switch.office_accent

      raise_tap:
        - action: light.turn_on
          target:
            entity_id: lights
          data:
            color_temp_kelvin: 4000

      lower_tap:
        - action: light.turn_on
          target:
            entity_id: lights
          data:
            color_temp_kelvin: 2700

      stop_tap:
        - action: scene.turn_on
          target:
            entity_id: scene.office_relax

      stop_hold:
        - action: script.turn_on
          target:
            entity_id: script.good_night
Use a light that supports the example color temperatures. Because raise_hold
and lower_hold are omitted, those holds still brighten and dim. On/Off taps
run their two actions in order. A short middle-button press recalls a scene;
a hold starts the script once.
Without overrides, button timing stays as before. Built-in Raise/Lower steps for lights, covers, and media players start on press. Built-in P2B/2B On/Off controls for those domains distinguish taps from holds.
When a button has a tap or hold override and either a built-in or custom hold action, Pico Link waits to distinguish the gesture. Without double tap configured:
- Release before
hold_time_ms: run the tap. - Keep holding to
hold_time_ms: run the hold and suppress the tap.
For example, overriding a Raise tap while keeping normal brightening means the first hold step happens at the hold threshold, instead of immediately on press. There is no additional hold delay after classification. A button with a tap override and no built-in or configured hold runs its tap on press, unless double tap is also configured. Buttons without overrides retain their normal handling.
The default hold threshold is 400 ms. The default interval between built-in brightness or volume ramp commands is 650 ms. Leave these settings out unless you want different timing. Network and device response time also affect the physical result.
Double-tap detection is enabled only for buttons with a _double_tap key.
Adding double_tap_time_ms alone does not enable it or delay other buttons.
- Make two short presses of the same button. The second press must begin before the window expires, measured from the first release. The default window is 300 ms.
- The double-tap action runs on the second release, provided neither press
reaches
hold_time_ms. The second release may occur after the double-tap window; the gap between the presses determines whether they belong together. - A single tap waits for the window to expire, then runs its configured or built-in tap action. A longer window is more forgiving but adds more delay to single taps on that button.
- Holding either press reaches the normal hold threshold without an additional double-tap delay. The hold runs instead of the pending tap or double tap. If the button has no built-in or custom hold, its single-tap action runs once at the hold threshold instead. Releasing does not run another action.
- Pressing a different button completes the previous pending single tap before handling the new button. Different buttons and different Picos never combine into a double tap. Three quick taps produce a double followed by a single; four produce two doubles.
Shade controls still stop an interrupted continuous movement before starting the next action. An unchanged On/Off tap that stops a moving shade also retains that immediate stop behavior, even with double tap configured.
Set double_tap_time_ms under defaults to change the window for all Picos,
or on one device to override it. It is independent of hold_time_ms; each
accepts 100–2000 ms. Omit it to use 300 ms. Detection uses separate asynchronous
timers for each remote; a waiting gesture does not block another remote.
pico_link:
  defaults:
    stop_tap:
      - action: scene.turn_on
        target:
          entity_id: scene.relax
    stop_double_tap:
      - action: scene.turn_on
        target:
          entity_id: scene.bright
    stop_hold:
      - action: script.turn_on
        target:
          entity_id: script.good_night

  devices:
    - name: Office Pico
      type: 3BRL
      lights: light.office
      stop_tap: default
      stop_double_tap: default
      stop_hold: default

    - name: Bedroom Pico
      type: 3BRL
      lights: light.bedroom
      stop_tap:
        - action: scene.turn_on
          target:
            entity_id: scene.bedroom_relax
      stop_double_tap: default
      stop_hold: default

    - name: Hallway Pico
      type: 2B
      lights: light.hallway
      # No Stop settings; On/Off keep their normal behavior.
On the Office Pico, one short Stop press recalls the relax scene after the default 300 ms window expires. Two quick presses recall the bright scene without first recalling relax. A hold starts the script once. The Bedroom Pico substitutes its own scene for a single tap. The other buttons keep their original timing.
Replace the scene and script IDs with ones that exist in your system. Each
shared action list runs only on remotes that opt into it. If you use an entity
placeholder such as lights, each remote selecting that list must have that
entity group; otherwise give it its own action list with suitable targets.
pico_link:
  devices:
    - name: Scene Pico
      type: 4B
      button_1_tap:
        - action: scene.turn_on
          target:
            entity_id: scene.movie
      button_1_hold:
        - action: script.turn_on
          target:
            entity_id: script.good_night
      off_tap:
        - action: light.turn_off
          target:
            area_id: living_room
A 4B entry needs at least one gesture override or a nonempty buttons mapping.
Do not assign an entity group such as lights to it.
Custom button lists run through Home Assistant's script engine. All gesture
overrides, shared Stop actions, middle_button, and the existing buttons
mapping accept script sequences. The simplest action is still a service call:
- action: light.turn_on
  target:
    entity_id: light.kitchen
  data:
    brightness_pct: 80
For service calls, action identifies the service, while target and data
are optional mappings. Home Assistant's service spelling is also accepted.
You can add conditions, delays, variables, templates, choose, if, repeats,
parallel branches, waits, and stop actions using the
Home Assistant script syntax
supported by your installed Home Assistant version. Pico Link validates the
sequence during setup and reports invalid configurations for the affected Pico.
This Stop tap uses a dim setting after sunset and a brighter setting during the day. Its double tap runs two actions with a short delay between them.
pico_link:
  devices:
    - name: Bedroom Pico
      lights: light.bedroom
      stop_tap:
        - if:
            - condition: state
              entity_id: sun.sun
              state: below_horizon
          then:
            - action: light.turn_on
              target:
                entity_id: lights
              data:
                brightness_pct: 15
          else:
            - action: light.turn_on
              target:
                entity_id: lights
              data:
                brightness_pct: 80
      stop_double_tap:
        - action: light.turn_on
          target:
            entity_id: lights
          data:
            brightness_pct: 100
        - delay: 2
        - action: scene.turn_on
          target:
entity_id: scene.bedtimeSet mode, max, and max_exceeded under defaults, on an individual device,
or both. Each device setting overrides its shared default; omitted settings
use the built-in values shown below.
| Setting | Built-in default | Purpose |
|---|---|---|
mode |
single |
What happens when another custom sequence starts |
max |
10 |
Maximum active runs in parallel mode, or running plus waiting runs in queued mode |
max_exceeded |
warning |
Log level when a new run is rejected: debug, info, warning, error, critical, or silent |
| Mode | Another custom gesture on the same Pico |
|---|---|
single |
Ignore the new sequence while a sequence is running. This also applies to a different button, including a custom Off action. |
restart |
Stop the older sequence's remaining work, then run the new sequence. |
queued |
Wait for previous sequences to finish, preserving arrival order. |
parallel |
Start a separate run immediately; its actions may overlap earlier runs. |
The policy and limit cover the whole Pico, across all custom buttons and gestures. Different remotes have independent runs and limits. Shared Stop defaults supply actions; they do not create one shared execution queue.
pico_link:
  defaults:
    mode: single
    max: 10
    max_exceeded: warning
  devices:
    - name: Kitchen Pico
      lights: light.kitchen
      mode: restart
      on_tap:
        - delay: 2
        - action: light.turn_on
          target:
            entity_id: lights
    - name: Bedroom Pico
      lights: light.bedroom
      # Inherits the shared settings.
In this example, Kitchen Off retains its built-in action. With restart, it
cancels the pending custom On sequence before sending Off, so the old delay
does not turn the light on afterward. Built-in controls are never queued or
ignored because a custom sequence is busy. In other modes, built-in commands
do not cancel a running custom sequence. Normal tap/hold/double-tap recognition
and ramp timing are unchanged.
Upgrade note: earlier versions allowed custom lists to overlap. Version 1.0
defaults to single, matching Home Assistant. Select parallel explicitly
where that old behavior is wanted. The new max limit still applies.
max must be a positive integer and applies only to queued and parallel.
Single mode always permits one run. When a limit is reached, the new sequence
is rejected and existing runs continue. max_exceeded: silent suppresses only
that log message; it does not suppress errors within actions. This setting also
controls the rejection message in single mode.
For compatibility, a plain list containing only action, optional data, and
optional target, with no templates, keeps the original behavior: log a failed
service call and attempt the next one. These service calls also run through
Home Assistant's engine, with compatibility handling around each step.
A list using additional script features or keys (including alias, service,
or continue_on_error) uses native script semantics for the whole list.
An action error normally stops that sequence. Set continue_on_error: true
on a particular action when later steps should still run:
stop_tap:
  - action: notify.mobile_app_phone
    continue_on_error: true
    data:
      message: Good night
  - action: light.turn_off
    target:
      entity_id: lights
An explicit continue_on_error: false also selects native error handling.
This option belongs on an action, not under Pico Link defaults or a device.
It does not bypass invalid configuration or every unhandled error; see
Home Assistant's error rules.
A failed condition or an explicit stop follows normal script control flow.
One failed sequence does not disable later presses or other remotes.
Actions normally run in order. Parallel branches run concurrently. A service call returning does not guarantee that a physical light or shade has finished moving. Releasing a custom hold lets its sequence finish; it does not repeat the sequence or trigger its tap. A later command in restart mode may cancel it.
Home Assistant shutdown cancels Pico Link's unfinished sequences, queued runs, waits, and gesture timers. They do not resume automatically after restart. Cancellation cannot undo commands already sent to a device.
You can still call a separate Home Assistant script for reusable logic.
Calling script.NAME waits for that script to return; script.turn_on starts
it separately and continues without waiting. Separately launched scripts keep
their own modes and lifecycle; cancelling Pico Link's sequence does not stop
them. Two remotes controlling the same device can send competing commands;
use a shared script when they need coordinated behavior.
In gesture overrides and middle_button lists, these values in
target.entity_id expand to the entities assigned to that Pico:
| Placeholder | Assigned entities |
|---|---|
lights |
All configured lights |
covers |
All configured covers |
fans |
All configured fans |
media_players |
All configured media players |
switches |
All configured switches |
For example, entity_id: lights targets the remote's assigned lights. You can
also mix placeholders and literal IDs:
stop_tap:
  - action: light.turn_on
    target:
      entity_id:
        - lights
        - light.accent_lamp
    data:
      brightness_pct: 80
Only use a placeholder for a group assigned to that device. Other target fields are preserved. Placeholders also work in nested action branches and loops; they are not substituted inside template text or arbitrary service data. Since 4B Picos have no assigned entity group, use explicit entity IDs or other Home Assistant target selectors for their actions.
Existing configuration formats remain supported. Review the new default execution mode when upgrading.
middle_button remains a supported way to replace the Stop (middle) button press.
For new configurations, prefer stop_tap, stop_double_tap, and stop_hold.
An omitted or empty middle_button keeps the domain's normal middle-button
action. This differs from stop_tap: [], which explicitly disables the tap.
middle_button:
  - action: scene.turn_on
    target:
      entity_id: scene.relax
To share a middle-button list, define it under defaults and explicitly opt in
on each 3BRL remote with middle_button: default:
pico_link:
  defaults:
    middle_button:
      - action: light.turn_on
        target:
          entity_id: lights
        data:
          brightness_pct: 80
  devices:
    - name: Bedroom Pico
      type: 3BRL
      lights: light.bedroom
      middle_button: default
You can migrate the shared tap list from defaults.middle_button to
defaults.stop_tap while leaving existing middle_button: default entries
in place. Conversely, stop_tap: default can use a shared middle_button list.
When both shared names exist, defaults.stop_tap wins. The legacy
middle_button: default with neither shared list present retains its old
behavior: use the domain's normal middle-button action.
A device's stop_tap overrides its middle_button, including when
stop_tap selects default or supplies []. Adding stop_hold without
stop_tap retains the existing middle-button tap but defers it until a short
press is released. Adding stop_double_tap also retains that tap, with the
additional wait for the double-tap window.
The existing mapping remains valid. Each configured entry must have at least one action. Unspecified buttons do nothing.
pico_link:
  devices:
    - name: Scene Pico
      type: 4B
      buttons:
        button_1:
          - action: scene.turn_on
            target:
              entity_id: scene.movie
        button_2:
          - action: scene.turn_on
            target:
              entity_id: scene.relax
        button_3:
          - action: script.turn_on
            target:
              entity_id: script.good_night
        "off":
          - action: light.turn_off
            target:
              area_id: living_room
You can add, for example, button_1_hold alongside buttons to add a hold while
retaining its existing tap. An explicit button_1_tap replaces that tap.
config_method belongs at the top of the Pico Link configuration and accepts
ui or yaml; see Choose your configuration method.
The remaining settings can be placed on a device or under defaults, except type, which
is optional and only read from the individual device. Configure a unique name
or device ID per Pico.
| Setting | Default | Accepted values / purpose |
|---|---|---|
type |
Auto-detected | Optional per device: P2B, 2B, 2BRL, 3BRL, 4B. An explicit value takes precedence. |
name / device_id |
One required | Identify the Pico |
lights, covers, fans, media_players, switches |
None | Exactly one group for non-4B remotes |
<button>_tap / <button>_hold |
Existing behavior | Action list; [] disables the gesture |
<button>_double_tap |
Disabled | Action list; enables detection for that button. [] consumes double taps without an action |
stop_tap, stop_double_tap, stop_hold on a 3BRL |
Existing behavior | Action list, [] to disable, or default for the shared action |
stop_tap, stop_double_tap, stop_hold under defaults |
Do nothing | Shared lists; used only when a 3BRL explicitly selects default. An omitted or empty shared list runs no actions |
middle_button |
Domain behavior | Older 3BRL tap setting, still supported; action list, or default to opt into the shared list |
buttons |
None | 4B button-to-action mapping |
mode |
single |
single, restart, queued, or parallel; shared across custom sequences on one Pico |
max |
10 |
Positive integer; active/queued run limit for queued and parallel modes |
max_exceeded |
warning |
Log severity when rejecting a new run, or silent |
hold_time_ms |
400 |
100–2000 ms before a hold is recognized |
double_tap_time_ms |
300 |
100–2000 ms from first release to second press; used only for buttons with a double-tap key |
step_time_ms |
650 |
100–2000 ms between built-in brightness/volume ramp commands |
light_on_pct |
100 |
1–100, brightness for built-in On taps |
light_low_pct |
5 |
1–99, minimum ramp brightness and first upward step from off |
light_step_pct |
10 |
1–25, brightness change per step |
light_transition_on |
0 |
0–300 seconds for built-in On taps |
light_transition_off |
0 |
0–300 seconds for built-in Off taps |
cover_open_pos |
100 |
1–100, target position for the built-in opening tap |
cover_step_pct |
10 |
1–25, position change per step |
cover_inverted |
false |
Reverse built-in cover On/Off directions |
fan_on_pct |
100 |
1–100, speed for built-in On presses |
media_player_vol_step |
10 |
1–20, volume change per step in percent |
Invalid mode, max, or max_exceeded values are configuration errors.
For the timing and device-control settings in the table, numeric values outside the
accepted range are clamped. Invalid numeric values
and zero use the setting's default (the transition defaults are themselves
zero). hold_time_ms also applies to custom holds for fans, switches, and 4B
remotes. step_time_ms does not repeat custom actions or control how fast a
shade motor moves.
Confirm you installed 1.0.0 or later with UI support, restarted
Home Assistant, and refreshed the browser. For a manual installation, check the
folder layout: manifest.json must be directly inside
custom_components/pico_link under the active configuration directory. Check
Settings → System → Logs for loading errors if it still does not appear.
- Confirm the Lutron Caséta integration is loaded.
- In Home Assistant's event tools, listen for
lutron_caseta_button_eventand press a Pico button. Verify both press and release events arrive. - Match the configured
device_idand the explicit or detected Pico type to the event. For name-based configuration, check the device registry name, including any room prefix. - Confirm the assigned entities exist and support the requested actions.
- Check Home Assistant's logs for Pico Link validation or service-call errors.
In YAML mode, Pico Link validates entries at startup and logs invalid entries without preventing other valid Picos from loading. Common causes include duplicate Pico IDs, an ambiguous device name, assigning more than one entity group, using a button key that does not exist on the chosen model, or supplying an action mapping where a list is required.
If no valid devices remain, the log says
pico_link is configured, but no valid Pico devices were created.
The preceding messages identify the individual errors. Restart Home Assistant
after correcting the configuration.
In UI mode, the editor validates the whole draft before saving. A startup failure appears on the Pico Link integration and is retried by Home Assistant; correct its settings or restore the missing registry device. UI loading does not silently skip a remote or activate leftover YAML.
If the log says it cannot detect the Pico type, check that the remote belongs
to the Lutron Caséta integration and has a recognized model in the device
registry. You can set type explicitly as described under
Pico type. A missing or unfamiliar model
does not trigger a guessed layout or automatic retries; correct it or supply
the type and restart.
A button with both tap and hold behavior must wait for release to recognize a tap. A button with double tap configured also waits for its double-tap window before executing a single tap. See Tap and hold timing and Double-tap timing. Lowering the hold threshold also makes it easier to trigger a hold accidentally. Buttons without overrides keep their existing timing.
If a custom press is ignored while a previous sequence is running, check
mode. The default is now single, shared across the Pico's custom
gestures. With queued or parallel, check max and the rejection logs.
Built-in fan and switch controls do not ramp. Custom hold lists run once;
step_time_ms does not make them repeat. A held button's custom sequence is
not canceled by release.
Lights and covers briefly remember their last requested target for rapid steps. After an external change, allow a short pause so they resynchronize from Home Assistant. Separate Picos have independent gesture state; if two control the same device simultaneously, their commands can compete.
Install the new version through HACS or your normal update method, then restart Home Assistant. If you use the UI, refresh your browser before reopening the Pico Link workspace so its updated controls load. Your saved UI settings are retained; no reimport is needed.
Check the startup log for the expected controllers and test the configured
taps, holds, and double taps. Existing YAML installations, including
middle_button and buttons settings, remain valid; new overrides are optional.